In the early spring of 1992, my flight instructor sent me out to my favorite airplane in the flight school’s Cessna 152 fleet to conduct my first solo cross-country flight. With a carefully-reviewed flight plan and freshly-endorsed logbook clutched in admittedly shaky hands, off I went. Nerves led to an early loss of positional awareness. More baldly stated, I got lost.
For a few minutes, I struggled to match the terrain I saw below to my carefully marked sectional chart. I struggled even more as I tried to use the plane’s single VOR indicator to pinpoint my position with cross-radials from two VOR beacons. In a mercifully short time that felt a lot longer than it really was, I settled my nerves, engaged my brain, and figured it out.
A few years later, my instructor silently watched me work my way through the three-leg instrument cross-country flight I needed to meet aeronautical experience requirements for the instrument rating. We flew the entire trip in instrument meteorological conditions (IMC) and, with GPS still unknown outside the military, I used VOR and ADF to navigate and to fly the no-kidding instrument approach procedures needed for every landing.
I carefully prepared for those and many other trips in terms of the available tools and techniques, but today’s simulation technologies make that planning seem positively primitive. So in our celebration of simulation, let’s take a look at how modern navigation simulation can help you try it before you fly it.
Related Content: The Future of Instructional Design in Aviation is Simulation
Visual Flight Rules
The most obvious way to use simulation for VFR navigation is to find a flight school that has an advanced aviation training device (AATD) (see “The A-Z of ATDs” for more on this topic) and “fly” the route you’ve planned. You can generally use this option with or without an instructor. Since visuals for navigation orientation and practice are only part of the picture (so to speak), some AATDs can really offer a tiedown-to-tiedown simulation experience.
If you don’t have access to this kind of AATD or you simply don’t need that much, online options still offer a lot more than I had in preparing for that first solo cross-country. Once you plot your route in one of the many capable aviation apps available for desktops, smart phones, and/or tablets, you can add layers (e.g., satellite view), zoom in, and scroll along the magenta line to pre-fly your route. If you spot some terrain feature or obstacle you would rather avoid, popular flight planning apps let you use your fingertips to adjust the route. If, on the other hand, you are actively looking for a particular feature on the ground, your simulated reconnaissance flight can help you figure out how to spot it more quickly from the sky.
When I was first learning to fly, preflight planning included making an airport chart that included a hand-drawn sketch of the runway(s) and taxiways, FBO location, and important notes made from what we then called the Airport/Facility Directory (now known as the Chart Supplement). A good friend of mine was well known in the student pilot community for the quality and outrageously exquisite detail of his airport diagrams.
To get smarter about the airports to be used on a trip, flight planning apps certainly provide their “vital statistics” and other basic information. To really get the picture, though, I like using Google Earth to explore the airport and its surroundings. Where available, the 2D and 3D options provide lots of situational awareness — and it’s just downright fun to “flightsee” with your fingertips. While working on this article, for example, I have greatly enjoyed navigating over and around favorite airports and aerial routes. With several, I set up a practice “descent” right down to the runway by using my fingertips to gradually advance and zoom in.
It’s safe to say we’ve come a long way from the days of hand-drawn airport diagrams.
Instrument Flight Rules
My instrument training in the mid-1990s began with what now seems like stone-age simulation: hours and hours of using a desktop “simulator” — more properly known as a basic aviation training device, or BATD. BATDs themselves have come a long way in the last quarter century, but even the one I used was highly effective as a procedures trainer. Since instrument flying is all about procedures — both the scanning and flight management procedures used to aviate and the navigation procedures essential to IFR operation — simulation is a fundamental part of most IFR training programs.
Whether you use a more capable ATD or any of the many apps available for desktops, smartphones, and tablets, here are two important ways that appropriate use of simulation can enhance your IFR navigation skills.
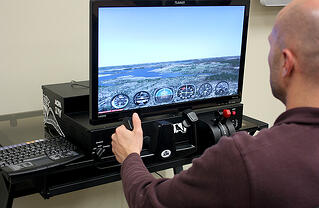 First is mastery of onboard navigation devices, both handheld and installed equipment. Fully understanding both the “knobology” (i.e., the mechanical operating scheme) and the content organizational scheme of your navigation equipment is important for any kind of flying, but it is absolutely critical to safe instrument flying. Reading the manual is always an option, but the desktop- or tablet-based navigation simulators most manufacturers offer for their products are usually more engaging — and thus generally more effective than just reading the operating manual.
Having spent many hours with a variety of computer-based equipment simulators, I can personally attest to their efficacy. To get the most from this kind of simulation, either work from the exercises the manufacturer’s manual suggests, or use your own flight plan to master all the basic data entry and content management skills necessary for IFR navigation.
Once you have mastered the basics of your boxes, simulation provides a time-and cost-effective way for you to learn (or practice) both the fundamental principles of IFR navigation and approach procedures, and to master the mechanical procedures required to execute them with your onboard navigational devices. Before you fly, use simulation devices or apps to ensure you know how to enter, edit, and navigate the following instrument procedures:
- IFR flight plan
- SIDs and STARs
- All types of instrument approach procedures (e.g., RNAV(GPS) to LPV, LP, and LNAV minima; ILS, VOR, VOR/DME)
- Holding patterns (both published and randomly assigned)
Familiarity with the airport environment is perhaps even more important in IFR flying than in VFR operation, so the kind of simulated Google Earth reconnaissance flight described earlier is a good idea for IFR trips as well. In addition to “flying” the final approach and landing with your fingertips, map the missed approach point and the missed approach procedure on your favorite flight planning app and, as described in the VFR section, add layers that let you see terrain and obstacles. Use the 2D and 3D options in the Google Earth app to zoom in even further, and make sure you know exactly where terrain and obstacles lie in relation to the MAP route you expect to fly.
Knowledge is Key
You can never know too much about the places you’ll fly from, over, around, and to; nor can you ever know enough about the procedures and tools you’ll use to navigate to those spots. So make the most of navigation simulation, and always try it before you fly it.
Share this
Introducing Redbird Navigator
-1.jpeg)
Practice What You Hate